Showing posts with label GIT Github. Show all posts

Thursday, 8 August 2019

USING HEAD AND GIT COMMIT HASH TO DIFFERENTIATE BETWEEN COMMITTED FILE VERSIONS

INTRODUCTION

In an earlier article, we showed you how to look at differences between a file after you’ve made a change to it. In this article, we will talk about how to view differences between committed versions while also explaining the term HEAD as it pertains to git terminology. We will also demonstrate how to use the git commit hash to refer to commits.
What is HEAD?
The HEAD in git terminology refers to the current committed state of the file in the git repository. Actually, the HEAD is a reference to the currently checked out commit. If you are using multiple branches in your git repository then the HEAD refers to the commit at the tip of the current branch. HEAD is just a convenient name to mean “what you have checked out” and we will demonstrate in the following examples how you can use the HEAD to refer to previous commits in the repository.

USING HEAD WHILE RUNNING GIT COMMANDS:

Example 1: To view differences between the current committed state of the folder and one commit before, type the following command.
[sahil@linuxnix my_first_repo]$ git diff HEAD~1
diff --git a/test.txt b/test.txt
index ba08292..e945f40 100644
--- a/test.txt
+++ b/test.txt
@@ -1,2 +1,4 @@
This is a test file!
Added another line to test file
+Adding a third line to test file
+Adding a fourth line to test file
[sahil@linuxnix my_first_repo]$
Example 2: To view differences between the current committed state of the folder and four commits before, type the following command.
[sahil@linuxnix my_first_repo]$ git diff HEAD~4
diff --git a/README1.md b/README1.md
index acea079..21a6b29 100644
--- a/README1.md
+++ b/README1.md
@@ -1,2 +1,2 @@
This is a readme file for my first git repository
-This is a second line
+This is another line
diff --git a/test.txt b/test.txt
new file mode 100644
index 0000000..e945f40
--- /dev/null
+++ b/test.txt
@@ -0,0 +1,4 @@
+This is a test file!
+Added another line to test file
+Adding a third line to test file
+Adding a fourth line to test file
[sahil@linuxnix my_first_repo]$
The /dev/null state for the file test.txt indicates that this file did not exist four commits earlier.
Example 3: Check how far back we can go with the HEAD
Let’s run the git log command to view the number of commits we have thus far in our repository.
[sahil@linuxnix my_first_repo]$ git log --oneline
41bfa8f Added third line to test.txt
23c9770 Added another line to test.txt
a291f69 Added file test.txt nad updated .md files
d76dd61 Modified the *.md files
99fa732 Created a new file README1.md
f9849b2 Added a line to README.md
f7eccb7 Added my first file
The above output tells us that we have a total of seven commits so using the HEAD, we can go as far back as six commits. If we run the git diff HEAD~6 command we will observe that both the files that currently reside in the repository had a previous state of /dev/null.
[sahil@linuxnix my_first_repo]$ git diff HEAD~6
diff --git a/README1.md b/README1.md
new file mode 100644
index 0000000..21a6b29
--- /dev/null
+++ b/README1.md
@@ -0,0 +1,2 @@
+This is a readme file for my first git repository
+This is another line
diff --git a/test.txt b/test.txt
new file mode 100644
index 0000000..e945f40
--- /dev/null
+++ b/test.txt
@@ -0,0 +1,4 @@
+This is a test file!
+Added another line to test file
+Adding a third line to test file
+Adding a fourth line to test file
If we try to look back further than the number of commits we have, git will give us an error message. Given below is an example.
[sahil@linuxnix my_first_repo]$ git diff HEAD~7
fatal: ambiguous argument 'HEAD~7': unknown revision or path not in the working tree.
Use '--' to separate paths from revisions, like this:
'git <command> [<revision>...] -- [<file>...]'
Example 4: Using the git commit hash
Referring to the previously committed versions of files using the HEAD appears to be convenient but can become cumbersome if the number of commits in the repository is very high. So, there’s a simpler way to refer to previous commits and that is by using the commit hash. Let’s take a look at the current git log for our repository.
[sahil@linuxnix my_first_repo]$ git log --oneline
7d39d7a modified test.txt
2d6f7f2 deleted file README.md
41bfa8f Added third line to test.txt
23c9770 Added another line to test.txt
a291f69 Added file test.txt nad updated .md files
d76dd61 Modified the *.md files
99fa732 Created a new file README1.md
f9849b2 Added a line to README.md
f7eccb7 Added my first file
To refer to a particular commit I just need to use the first seven digits of the commit hash that appear in the git log –oneline output. Let’s use the commit hash 23c9770 of the third commit from the current commit.
[sahil@linuxnix my_first_repo]$ git diff 23c9770
diff --git a/README.md b/README.md
deleted file mode 100644
index ba76a74..0000000
--- a/README.md
+++ /dev/null
@@ -1 +0,0 @@
-This is a readme file for my first git repository
diff --git a/test.txt b/test.txt
index ba08292..e945f40 100644
--- a/test.txt
+++ b/test.txt
@@ -1,2 +1,4 @@
This is a test file!
Added another line to test file
+Adding a third line to test file
+Adding a fourth line to test file
[sahil@linuxnix my_first_repo]$
As you can see the output is the same as it would’ve been if we had used HEAD. We could’ve used the entire string present in the commit hash but the first seven characters are unique enough to suffice on their own.
GITHUB AND GIT INTEGRATION

INTRODUCTION

In the articles we’ve posted thus far, we’ve worked with git and saved changes by making commits on our local system. This is one way to use git i.e like a local backup system wherein we save the state of our files so that we may revert back to a specific state of a file if and when required. In this article, we will demonstrate how we may integrate our local git repositories with the GitHub code hosting and collaboration platform and also explain important terms and related vocabulary along the way.
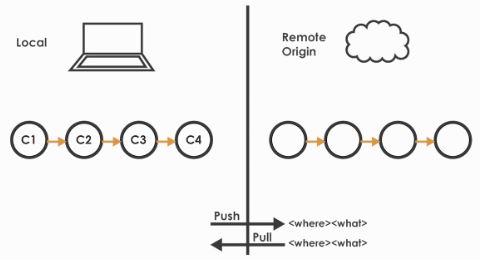
Given below is a pictorial representation of how to create, use and integrate our git repositories on local and remote systems.
We may refer to this representation on multiple occasions throughout the length of this article.
What is a remote?
Using git as a local backup system is good but it’s not good enough because we may lose the local system and the data along with it in an unlikely event. So we may end up losing all our work. Now let’s introduce the term ‘remote’.
In simple terms, you may consider a remote as any folder or place where you did not type ‘git init’ to create your git repository initially. The most common remote that we see is some cloud or Internet-based services. Among these services, GitHub is a very popular one.
What is GitHub?
GitHub is a service which stores all the git related information that you had on your local computer. It allows you to have an unlimited amount of repositories as long as they are open source and publically available. You could even use GitHub as a project management software.
You can have issues which are a good way to document code bugs. You can have pull requests which is a way to add small bits of changes to your code. You may also have a wiki where you may store some information related to a project.
We would like to add that github isn’t the only service that stores git repositories. Given below are two popular alternatives to GitHub:
1) Bitbucket
2) Gitlab
Signing up on GitHub:
Signing up on GitHub is a fairly simple process. All you really need is a valid email address and an internet connection. Open https://github.com and you’ll be brought to the signup page as shown in the screenshot below:

Using GitHub as a remote:
For the purpose of this article, we will be using GitHub as a remote. It takes all of the commits on our local computer and makes a local copy of it. The way we interact with the local computer and the remote is by means of pushing code to the remote and pulling code from the remote. We can have multiple remotes i.e. we can save our git repository to multiple locations. By default, our primary remote location is called origin and this is a convention that is followed throughout git related documentation.
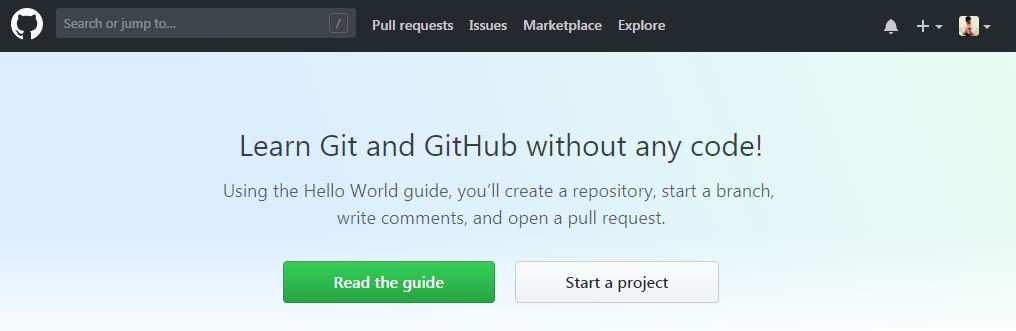
When you log in to GitHub you’ll be brought to the below page:
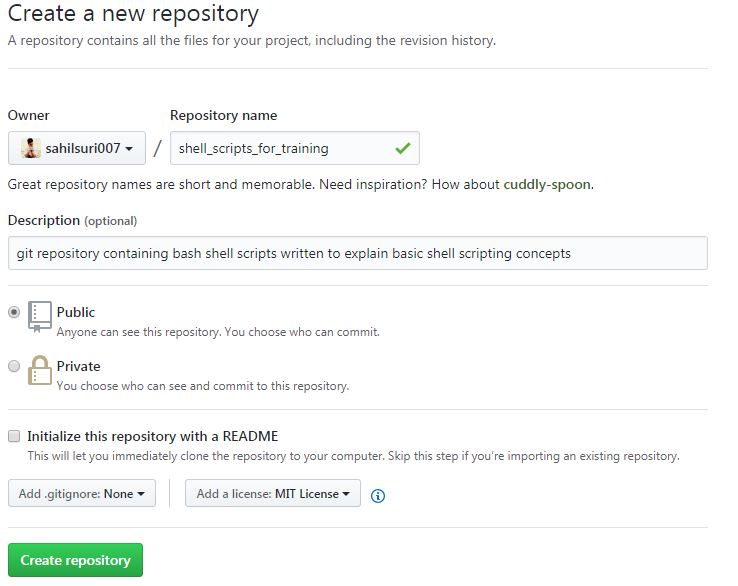
Click on ‘start a project’ to create a new repository. This will bring you to the below page where we will provide a name for our repository along with a description. We may keep the repository public or private and initialize the repository with a README and .gitignore file. The repository I’ll be using already has a README file so I won’t initialize one here. We can also specify a license outlining how we intend our code/files to be used. After we’ve entered the information, we need to click on ‘create repository’.
The name for the repository we give here does not have to match the git repository on our local system. But when we or other people copy our repository from github then the repository will be copied using this name. Initially, we will be using https protocol to establish communication between git and GitHub. In a later article, we will demonstrate how we could use ssh instead of https so that we do not need to type in credentials every time we communicate with github.
Now we move to the command line where I have created a local git repository in the folder /home/sahil/git/scripts_for_training. This contains a couple of shell scripts that I had created to be used for explaining bash shell scripting concepts for an organizational training. So now we’ll use github as our remote, named as the origin and will push code from our local repository to github. Given below is the command we need to type to accomplish this task.
[sahil@linuxnix scripts_for_training]$ git remote add origin https://github.com/sahilsuri007/shell_scripts_for_training
[sahil@linuxnix scripts_for_training]$ pwd
/home/sahil/git/scripts_for_training
Note that this command needs to be typed from within the folder in which our git repository resides. Once this command executes successfully, the term origin becomes a shortcut for the entire URL.
If we execute ‘git remote -v’ we get the following output:
[sahil@linuxnix scripts_for_training]$ git remote -v
origin https://github.com/sahilsuri007/shell_scripts_for_training (fetch)
origin https://github.com/sahilsuri007/shell_scripts_for_training (push)
[sahil@linuxnix scripts_for_training]$
Notice that both the remotes are named origin.
We have a fetch URL and a push URL indicating that we could fetch code from one place and push it to another place and these URLs will generally be the same. To push our repository from the command line to GitHub, we use the git push command. This asks for our github username and password.
When I tried to push my changes to github, I was greeted with an error.
[sahil@linuxnix scripts_for_training]$ git push origin master
Username for 'https://github.com': sahilsuri007
Password for 'https://sahilsuri007@github.com':
To https://github.com/sahilsuri007/shell_scripts_for_training
! [rejected] master -> master (fetch first)
error: failed to push some refs to 'https://github.com/sahilsuri007/shell_scripts_for_training'
hint: Updates were rejected because the remote contains work that you do
hint: not have locally. This is usually caused by another repository pushing
hint: to the same ref. You may want to first merge the remote changes (e.g.,
hint: 'git pull') before pushing again.
hint: See the 'Note about fast-forwards' in 'git push --help' for details.
As a fix for this, I pulled the repository I had created from origin (github) to my local computer using git pull.
[sahil@linuxnix scripts_for_training]$ git pull origin master
From https://github.com/sahilsuri007/shell_scripts_for_training
* branch master -> FETCH_HEAD
Merge made by the 'recursive' strategy.
LICENSE | 21 +++++++++++++++++++++
1 file changed, 21 insertions(+)
create mode 100644 LICENSE
Now I tried the ‘git push’ command again and this time it worked.
[sahil@linuxnix scripts_for_training]$ git push origin master
Username for 'https://github.com': sahilsuri007
Password for 'https://sahilsuri007@github.com':
Counting objects: 32, done.
Delta compression using up to 2 threads.
Compressing objects: 100% (30/30), done.
Writing objects: 100% (31/31), 5.63 KiB | 0 bytes/s, done.
Total 31 (delta 13), reused 0 (delta 0)
remote: Resolving deltas: 100% (13/13), done.
To https://github.com/sahilsuri007/shell_scripts_for_training
b3a0afa..059fdd9 master -> master
[sahil@linuxnix scripts_for_training]$
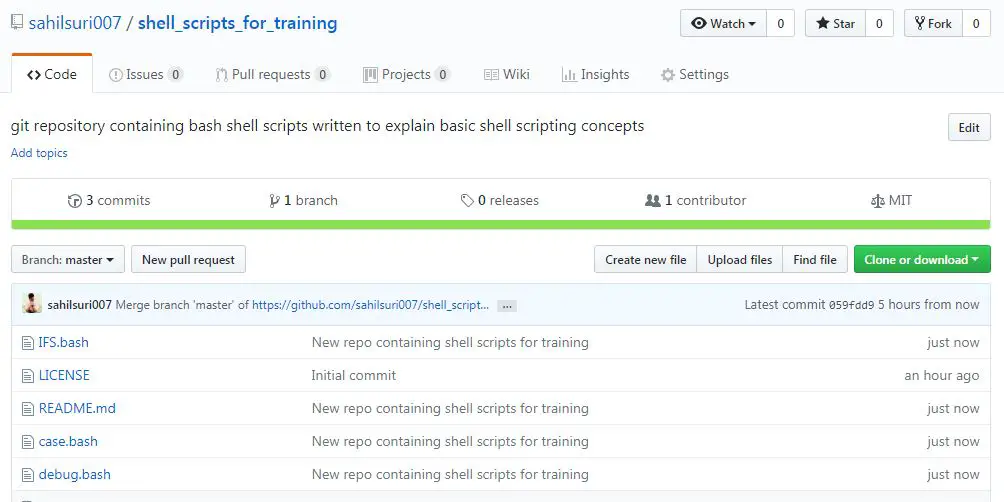
The .git folder in our repository which gets created when we typed ‘git init’ gets compressed and shipped off to github or the remote that we are specifying. Git doesn’t store a new version of a file every time we make a commit rather it stores the individual differences between subsequent commits. So, there is not a lot of extra space being consumed when we start using git. The only time an entire file gets copied will be the case when git can’t resolve the individual differences between subsequent versions of the file. Examples of such files could be some pdfs, word and excel documents. If git is unable to obtain a clean diff between file versions then it will create a new copy of the file. After we’ve pushed our changes if we now take a look at the repository we created on GitHub we will observe that it has been populated with the files that we had pushed to it from the command line of our local system.
GitHub renders the README.md file on the repository page itself. This helps people in understanding the content/description of the repository without having to download the repository files.